Build April 2020: Preparing the Facade Insulation, Building the Pump Board and Installing the Interior Spray-on and BIB insulation
Before the Thermory facade panels can be installed, an extra layer of 2" rigid insulation is added to the exterior. The pump board, which will later control the radiant floor heating, the domestic hot water and the Post-Occupancy monitoring, is preassembled off-site in a private garage. At the end of April, the Closed-Cell Spray-On and Blown-In-Blanket (BIB) insulation gets installed.
Early April - Facade Build-Up
The main component as a defense against the elements in our facade is the wrinkled Tyvek membrane that provides a solid weather protection and is directly mounted onto the sheathing. A 2" rigid layer of XPS insulation follows and eliminates all thermal bridging in the wood framing behind. Finally, 1x3" furring strips are installed to provide backing for the cedar Thermory exterior siding.
The wrinkles in the Tyvek membrane are a common structure in any Exterior Facade Insulation System EIFS - if any accumulation of humidity would ever occur behind the waterproof foam, the membrane will allow the water running down to the flashing and dry out to the outside, without effecting any of the wooden structure or the siding itself. The furring strips, in addition, allow air movement behind the actual siding (rain screen system), so there is a double safety build into this facade.
A sketch of how we will articulate the building corners - a 1x1" mild steel L-profile will be mounted into the corner cavity, reflecting the steel material of the sunblades in this detail.
Everything comes together on the north facade - the foam is installed, the seams are carefully tape-sealed, any additional cavities are foamed out, and facade penetrations are air-sealed with extreme care. All this effort will pay back when it comes to overall building airtightness, which is a major requirement for any high-performance building. This wall is now ready for the final siding.
Below: The first Thermory heat-treated cedar boards are mounted, creating a wonderful and precise transition between the wooden Sierra-Pacific Aspen aluminum-clad windows and the facade.
The image of the entry facade in progress depicts the different layers and components that will define the building's exterior. An important approach for the design was to limit materials to the necessary (wood/anthracite metal/glass on the outside, white walls, concrete and baltic birch plywood on the inside), to allow for a neutral, well-designed building that is ready to incorporate the client's lifestyle, rather than prescribing through an overwhelming choice of materials and useless decoration.
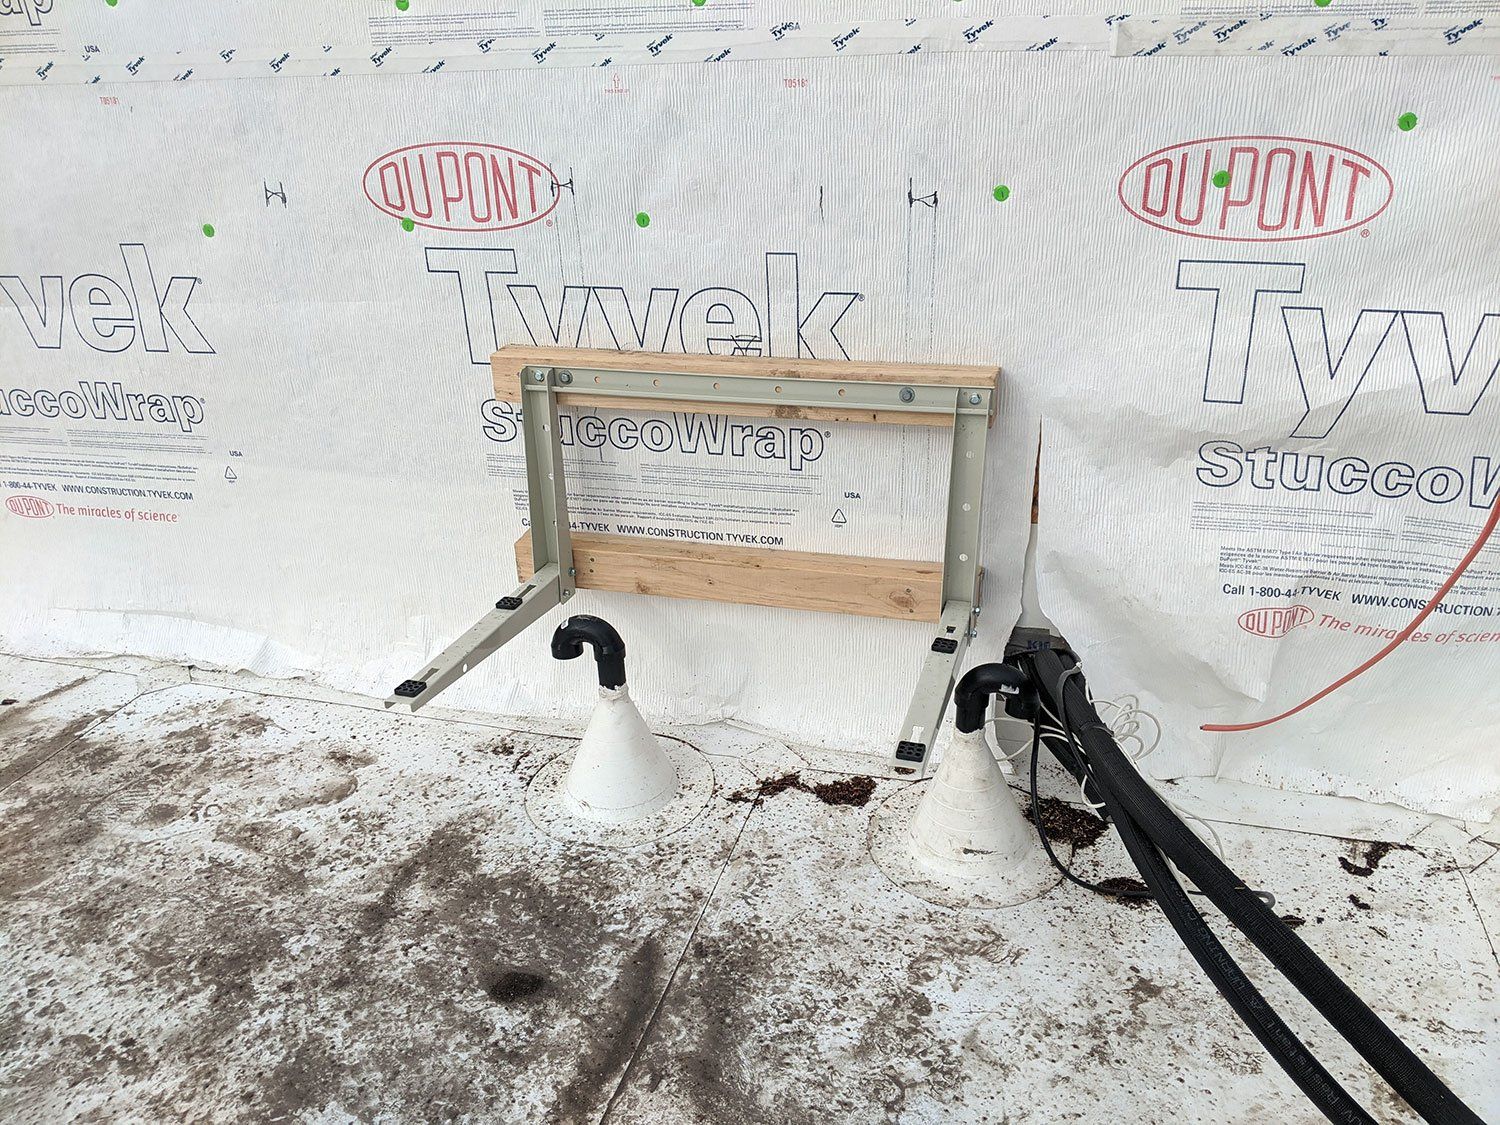
Early April - HVAC Systems configured, build and prepared for later installation
The HVAC task includes the spatial configuration and pre-installation of the Zehnder ERV unit, the pre-configuration of the Mini Split system for cooling (and additional heating where required), the design and build of the radiant and DHW pump board, and the design and pre-configuration of the Post-Occupancy monitoring equipment. Since standard components for code-standard buildings are usually way oversized for a highly efficient and in this case very small building, we design, build and assemble many of the components ourselves and according to the Active Building Compact Core ABCC, which has been previously installed and tested in several high-performance and affordable buildings.
Active Building Compact Core ABCC
All components are pre-assembled on a board for a most efficient layout, and to test functionality and performance, before it is finally mounted on a sturdier sheet of plywood. The hot water flow meter under the expansion tank is part of the Post-Occupancy monitoring system and will measure the amount of hot water being used for the radiant system.


The ductwork for the Energy Recovery System penetrates the exterior building skin, therefore has to be carefully air sealed. This is done with specific rubber gaskets, slow expanding foam and Tescon Passive House approved tape. The 5" Zehnder ductwork is made from strong, expanded PolyPropylene, thus including the required insulation in the component itself.
Shown below are also images of the final install of the sewer system. Receiving wrong information on the required sewer height by building officials at the beginning of the building process, we had to adjust the sewer underneath the building to the right height.


The box on the right shows the Mini Split distribution cassette that will deliver cold or hot air through a very short ducted system into the bedroom and bathroom. It's compressor will be mounted on the east facade outside and above the mechanical room, which constitutes the best compromise - usually a north facade location works best since the unit is protected from direct sunlight, but due to the challenging site constraints there is not enough space in the north to do so.
A typical challenge during construction - since we were not 100% trained in the installation of the ductwork of a Mini Split system, we subcontracted this small bit out. When running the ducts to the compressor, the subcontractor simply drilled through the TPO roof membrane at a point that is borderline low - it would have been easy to simply have the penetration done about 6" higher and above the TPO membrane. We will fix this by carefully sealing this penetration and make sure no water will get into the building in the future.


Late April - Interior Insulation systems are installed
For all areas that need additional, high-R value insulation as well as additional air tightness, we use a layer of 4" closed cell spray-on insulation. This also ensures that there is no dew-point issue in the flat warm roof assembly.
After applying the spray on insulation, the remaining cavities are filled with Blown-In Blanket BIB insulation and receive a moisture barrier where necessary to complete the insulation system (which includes the additional 2"-4" exterior rigid insulation). The building's interior is now ready for the drywall application. To the right is a view from the gallery out to the main house to the south. The large glass openings will provide ample daylight throughout the year, at the same time keeping the direct summer sunlight out to avoid overheating.


Late April - Interior Detail Work
To create a smooth shadow line transition between the baseboard and the inside wall, we use Tektrim profiles to create a 1/4" reveal. The profiles have to be mounted before the drywall goes in...
... with the sheetrock sliding into the groove from above. The baseboards are then mounted below the drywall and flush to the floor, creating the desired reveal. Afterwards all is painted in a neutral, flat white, which creates a wonderfully clean, modern detail - and you never have to dust off your baseboard tops ...
The build-in cabinet is a PAX base frame from Ikea. The company's quality is often questionable, but for kitchen base cabinets and bedroom closets, it provides an alternative to custom-build furniture....
... if the frames are solidly build into the framing, which is what the image to the left is showing. Using corner beads, the cabinet will be literally 'mudded' into the wall, providing the strengths necessary to last for many years. An additional advantage is that the clients can now decide what 'interior' they will need and purchase those at their desire at Ikea.
One has to eat and the Kungas are still perform magic when it comes to lunch. We are not entering their house any more, so they bring the food outside, where we enjoy it on a makeshift dining table...